本帖最后由 小雨同学 于 2015-1-16 09:18 编辑
iTop与Nagios的集成方法
Integrating iTop with NagiosThis page explains how to integrate iTop and Nagios. Through this integration:
- Nagios alarms are turned into Incident tickets in iTop
- The details of the Nagios status for a device is visible directly within iTop (as an extra tab on the object)
Though the configuration of Nagios is quite specific (definition of a command, a handler), the same principles can be applied to any web-based monitoring tool that is capable of running a command line script upon reception of an alarm.
The advantage of transforming the Nagios alarm into a ticket in iTop are numerous, for instance:
- the ticket can be tracked from its creation to its resolution
- A SLA can be assigned to the ticket to ensure its resolution is done on time
- iTop can compute the “impacted” infrastructures due to a failure of one of its components. The “impacted” items are automatically added to the Incident ticket
- iTop can notify the various persons impacted by the incident
Automating the creation of incident tickets in iTopThis section describes how to configure Nagios to create automatically incident tickets in iTop. Since Nagios “commands” are based on command line script, a special PHP script was written that wraps iTop's SOAP web service for creating an incident ticket, from the command line. Note that since the command line script called by Nagios uses a SOAP web-service to create the ticket in iTop, Nagios and iTop can be installed on different server, provided an HTTP(S) connection is possible from the Nagios server to iTop.
This script is called “createTicket-nagios.php”. It can be downloaded from here: [ /documentation/createTicket-nagios.zip]documentation/createTicket-nagios.zip[/url]
Copy this script in a directory on the nagios server (for example /etc/nagios3) and copy in the same directory the file 'itopsoaptypes.inc.php' taken from the directory 'webservices' of your iTop instance.
- This script is using the hostname of the host that triggered the alarm in Nagios in order to identify the impacted object in iTop. Therefore the hostname has to be unique.
- The script triggers tickets only for Nagios alarms that are in HARD state. Moreover, it requires a default Workgroup to assign the ticket, a default caller and a default customer to be already configured in iTop. (Look at the iTop documentation here to have more details on Workgroups, Callers and Customers)
- The severity of the ticket is always the same, set to critical by default.
- This script is just an example describing how to use iTop soap web service. Feel free to improved depending on your requirements.
All parameters used for ticket creation are listed at the beginning of the script, as shown below, and must be adapted to your configuration.
<?php
// Adjust these settings to fit your iTop installation
// iTop Server location
define('ITOP_SERVER_URL', 'https://localhost/webservices/itop.wsdl.php');
// Valid credentials for connecting to iTop
define('ITOP_USERNAME', 'admin');
define('ITOP_PASSWORD', 'admin2');
// Default settings for creating the incident ticket
define('DEFAULT_IMPACT', 2); // 1 = department, 2 = service, 3 = person
define('DEFAULT_URGENCY', 2); // 1 = high, 2 = medium, 3 = low
define('DEFAULT_CALLER_NAME', 'Dali');
define('DEFAULT_ORGANIZATION_NAME', 'Demo');
define('DEFAULT_SERVICE_NAME', 'HW Monitoring');
define('DEFAULT_SERVICE_SUBCATEGORY', 'HW Troubleshooting');
define('DEFAULT_WORKGROUP_NAME', 'Hardware support');
// End of instance-specific parameters
Installing the files on the Nagios server
- Step 1: Copy this script in <yourDirectory> as well as itopsoaptypes.class.inc.php
- Step 2: Define a new Nagios Command by adding following to your Nagios command file (most of the time it is called commands.cfg)
# Create incident tickets in iTop command definition
define command{
command_name create-iTop-ticket
command_line <php path> <yourDirectory>/createTicket-nagios.php \"$HOSTNAME$\" \"$SERVICEDESC$\" \"$SERVICESTATE$\" \"$SERVICESTATETYPE$\" \"$LONGSERVICEOUTPUT$\"
}
where <php path> is the full path for PHP and <your_directory> the path where you installed installed the iTop scripts.
You can test the ticket creation by running manually the PHP script.
Step 3 : Use this command in an event handler option for each host or service template that should trigger a ticket creation:
You can define it globally for all hosts and services using following options defined most of the time in nagios.cfg:
global_host_event_handler=create-iTop-ticket
global_service_event_handler= create-iTop-ticket
Or for each host and services using following options:
event_handler create-iTop-ticket
event_handler_enabled 1
if you choose the latter option, you will have to configure the handler for each host and service templates you create.
Once done, next time you will have a HARD alarm in Nagios it will create a ticket automatically in iTop !
Cool !
Viewing the Nagios status in iTopWhen the details of a given object are displayed in iTop there are several tabs in the browser's frame. You can create a new tab displaying a Nagios frame for the selected object.
- Go in directory “<iTop path>/modules/itop-config-mgmt-1.0.0/” and edit file “model.itop-config-mgmt.php”.
- Search for the section “class InfrastructureCI”
- Add the following function within this class. This will add a Tab Nagios for all InfrastuctureCI on production, when you are not in edit mode.
function DisplayBareRelations(WebPage $oPage, $bEditMode = false)
{
parent: DisplayBareRelations($oPage, $bEditMode);
if (!$bEditMode)
{
$sStatus = $this->Get('status');
$sName = $this->Get('name');
if ($sStatus == 'production')
{
$oPage->SetCurrentTab(Dict::S('Nagios'));
$oPage->add(\"<iframe width=\\"100%\\" height=\\"400\\" src=\\"http://<nagios_path>/cgi-bin/status.cgi?host=$sName\\"></iframe>\");
}
}
}- Don't forget to change the “<nagios_path>” to the appropriate URL for your installation.
Note that the display will work only if the name of the object you are using in iTop is equal to the hostname of the object in Nagios.
Once done, save the file and reload the “details” page in your browser.
The result should be similar to following picture:
[ ttps://wiki.openitop.org/lib/exe/detail.php?id=integrating_itop_with_nagios&media=mediawiki:nagiosinitop.png]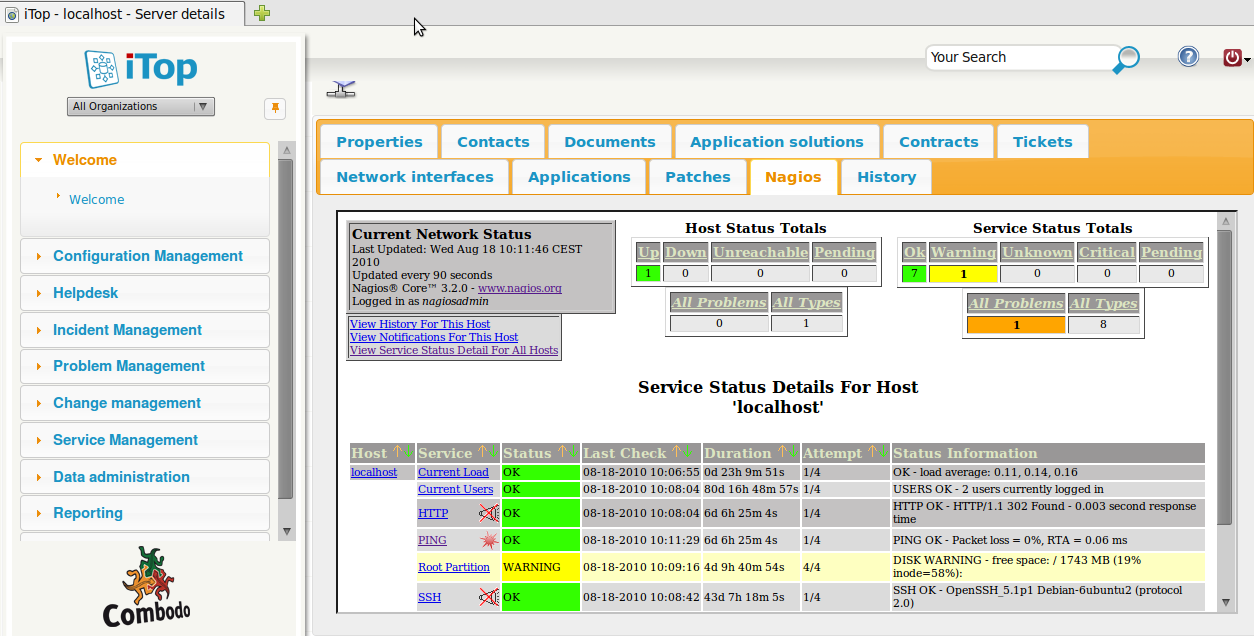 [/url] [/url]
原始资料出处:[ ttps://wiki.openitop.org/doku.php?id=integrating_itop_with_nagios&s[]=nagios]https://wiki.openitop.org/doku.php?id=integrating_itop_with_nagios&s[]=nagios[/url] |


 转播
转播 分享
分享 淘帖
淘帖 ()
()


